> ## Documentation Index
> Fetch the complete documentation index at: https://checkly-422f444a-auto-update-api-spec.mintlify.site/llms.txt
> Use this file to discover all available pages before exploring further.
# Single Sign-on in Checkly
> Overview of Single Sign-On (SSO) in Checkly for enterprise customers, including setting up the connection and other frequently asked questions
SSO is only available for Checkly's [enterprise plans](https://www.checklyhq.com/pricing/).
## Setting up the connection
The general process is detailed below, but please reach out to your customer success team or to [support@checklyhq.com](mailto:support@checklyhq.com) if you have questions or concerns. We're flexible and are more than happy to work with you on your specific use case.
To get started with SSO, email [support@checklyhq.com](mailto:support@checklyhq.com). We'll review your account and ask you a few questions.
We'll send you a self-serve link to set up the SSO connection. This includes instructions for configuring the connection in your IdP, plus a place to upload your connection metadata to Checkly.
The self-serve link is valid for 5 days. After accessing the link, you'll have five hours to complete the setup and can access it up to 10 times. This limit is pre-set by our authentication tool and isn't controlled by us.
If your self-serve link expires, let us know, and we'll generate another one for you. Alternatively, you can follow the manual setup process below.
If you need our logo for the Checkly IdP tile, we provide several [here](/assets/checkly-logos-for-sso-tiles.zip).
We highly recommend using the self-serve link process mentioned above. If that doesn't work for any reason, we can manually configure the connection.
The information provided is for the SAML protocol — let us know if you need something other than SAML.
First, send us your:
* email domain(s)
* sign in URL
* sign out URL (optional)
* public X509 certificate
Then, we'll send configuration details for your end:
* Postback URL
* Logout URL (optional)
* XML metadata
* Entity ID
The most important thing is that we get the email address back from your SSO Idp. This way we can map the existing Checkly user to your Idp user.
Thus, please make sure the attributes returned include an "email" and "name" field, e.g.
```
{
"email": ,
"name":
}
```
For how to configure a SAML connection with your IdP, please refer to your IdP's documentation:
* [Google Workspace](https://knowledge.workspace.google.com/admin/apps/set-up-your-own-custom-saml-app)
* [Microsoft Entra ID](https://learn.microsoft.com/en-us/entra/identity/enterprise-apps/add-application-portal-setup-sso)
* [Okta](https://support.okta.com/help/s/article/How-To-Configure-A-Custom-SAML-App)
Test the connection by logging in to Checkly through your IdP dashboard.
Once logged in to Checkly, verify the SSO connection worked by going to the [Members page](https://app.checklyhq.com/accounts/settings/account/members) (Click the profile picture in the top right, select **Members**) and make sure there is a checkmark in the SSO column for your user:
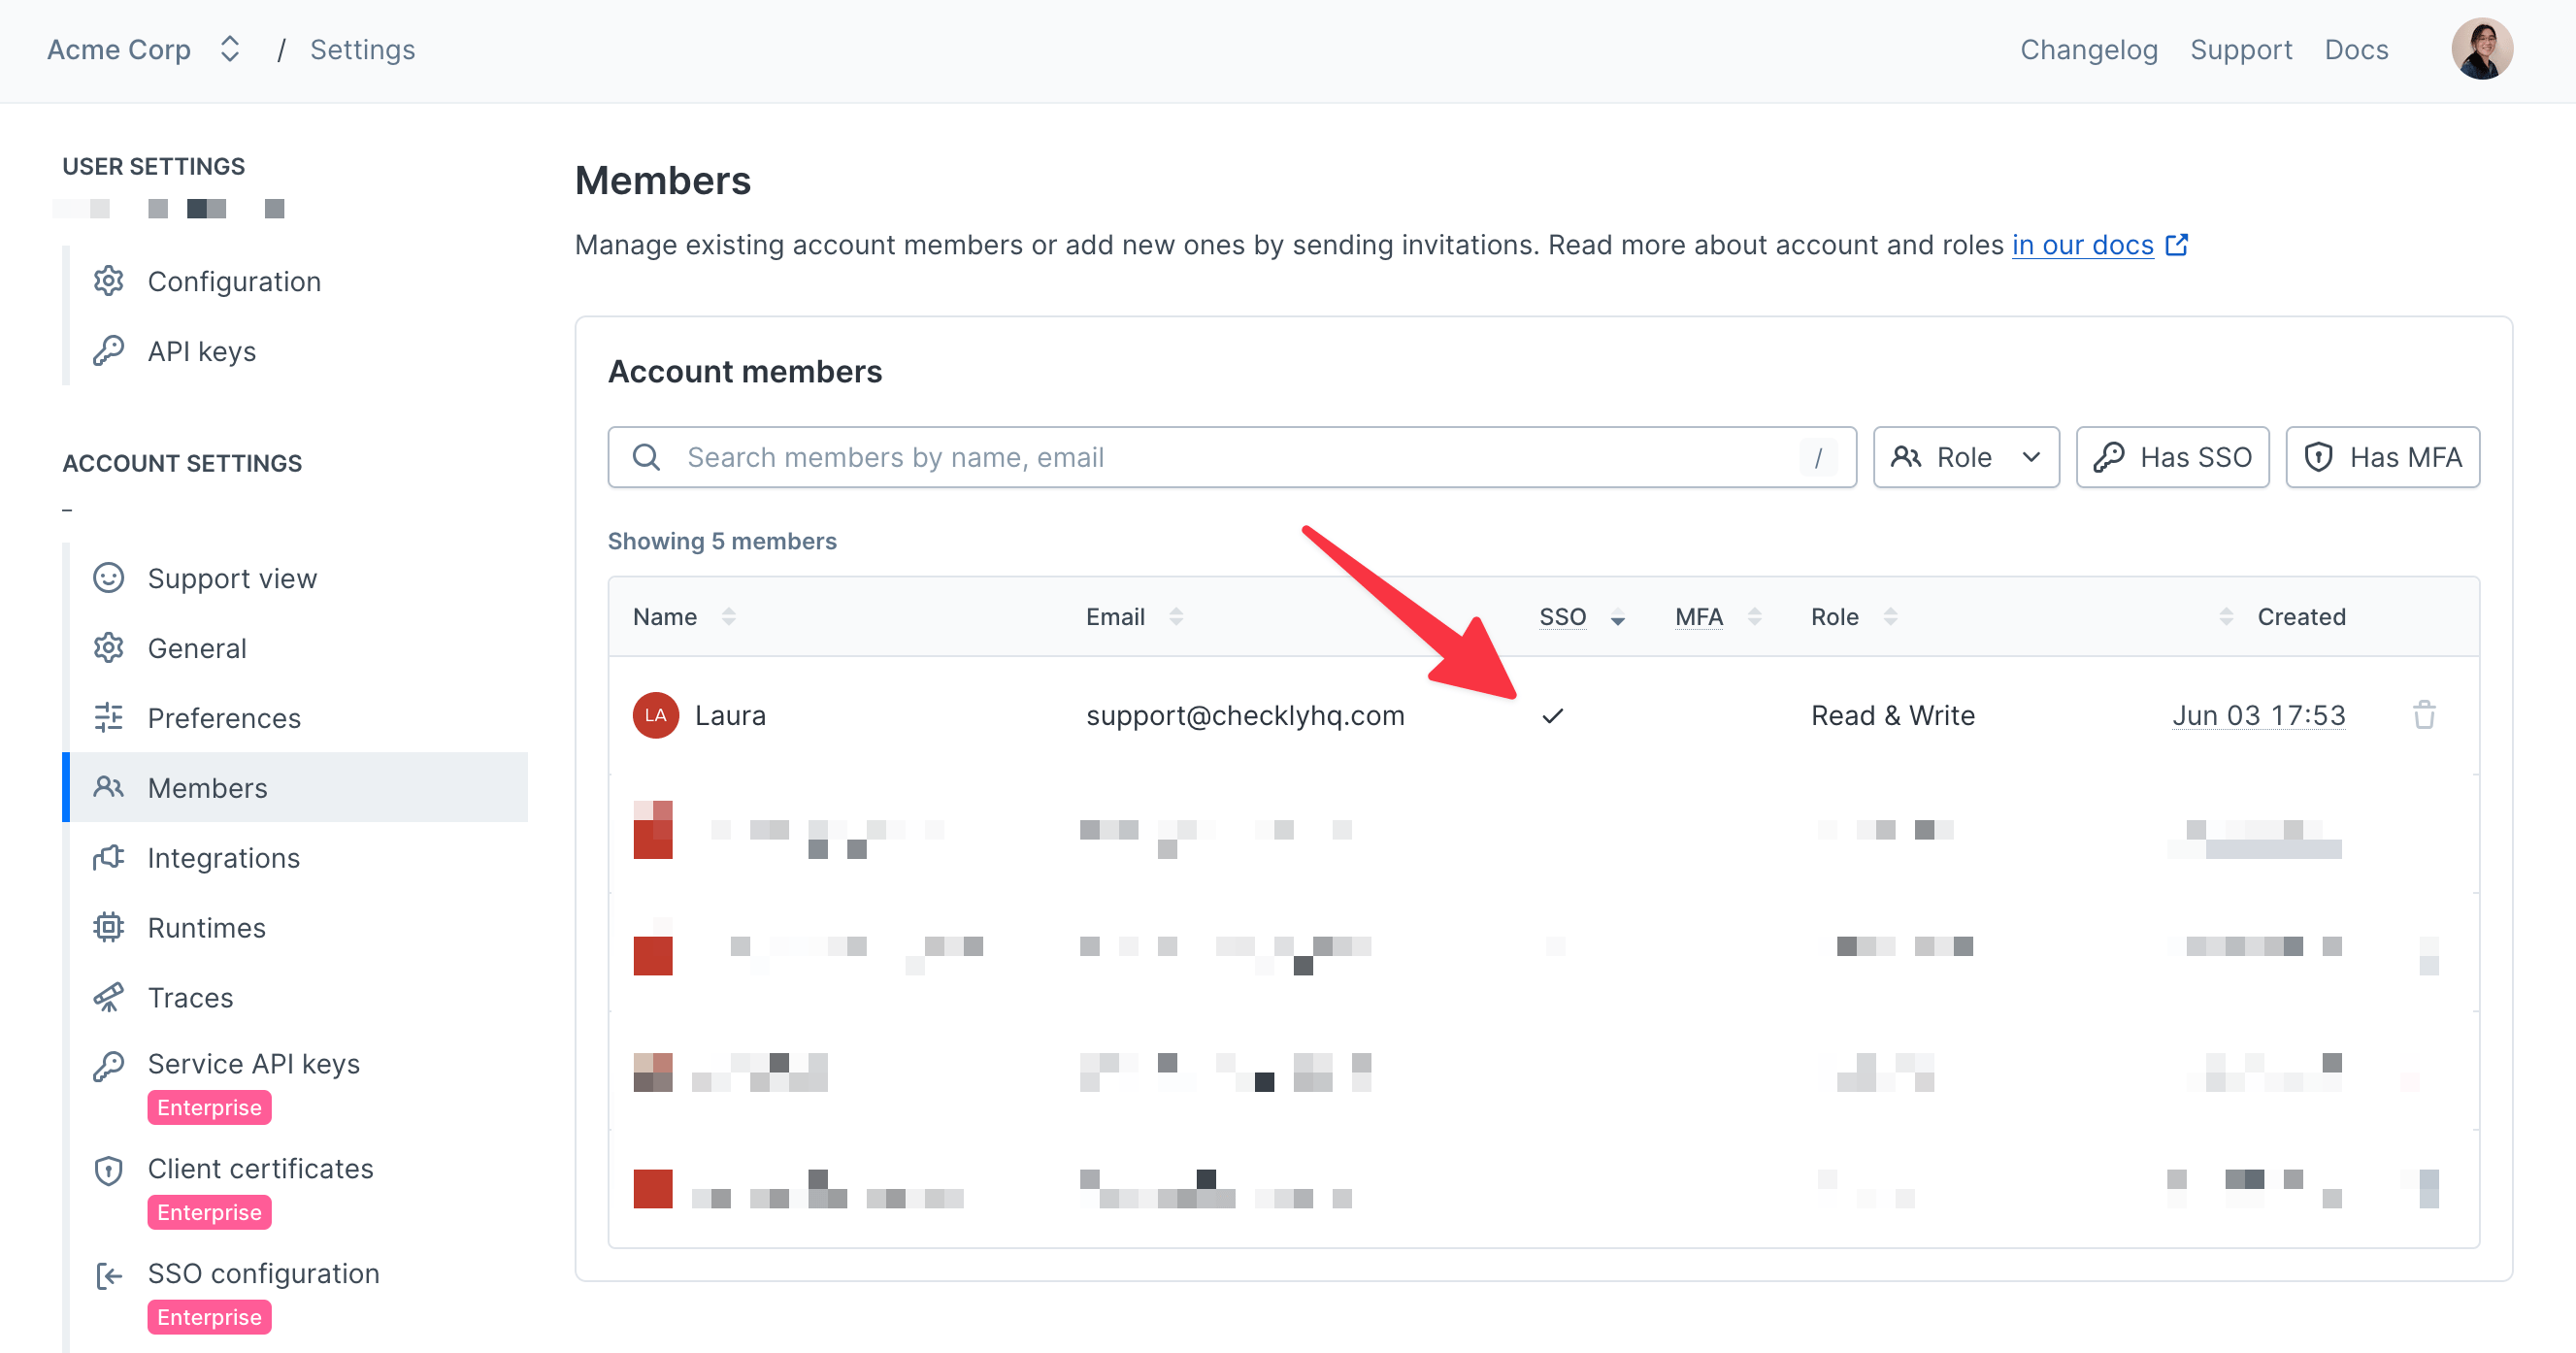 If you see that SSO checkmark, congratulations! The connection works. If not, no worries — let us know and we can set up a call to troubleshoot.
When existing users log in via SSO, a new user will be created. This is expected, as detailed [here](/admin/team-management/single-sign-on#migrating-existing-users-to-sso).
If you would like [SP-initiated SSO](/admin/team-management/single-sign-on#service-provider-sp-initiated) enabled, let us know. We'll update the connection with your company's email domains.
We recommend [migrating your existing users to SSO](/admin/team-management/single-sign-on#migrating-existing-users-to-sso).
This is not required, but we highly recommend it to prevent any confusion with duplicate users.
If you have any questions or need to modify your SSO connection, please reach out to [support@checklyhq.com](mailto:support@checklyhq.com).
## Logging in with SSO
We support both IdP- and SP-initiated SSO.
### Identity provider (IdP) initiated
IdP-initiated SSO happens when you login to Checkly through your IdP. Typically, this means going to your IdP dashboard and selecting the "Checkly" application.
Checkly enables this by default, though there may be extra configuration needed on your IdP's side.
### Service provider (SP) initiated
SP-initiated SSO happens when you login to Checkly directly by going to [app.checklyhq.com](https://app.checklyhq.com/) and entering your email address.
Using the "Continue with Google" or "Continue with Github" buttons will not redirect to SSO — you must use the email address field.
To check if SP-initiated SSO is enabled for your account, go to your [SSO configuration page](https://app.checklyhq.com/accounts/settings/account/sso-saml) and make sure the **Tenant Domain** field is filled. Email logins from those domains will route to your SSO connection.
To update this setting, reach out to [support@checklyhq.com](mailto:support@checklyhq.com) with the email domain(s) that you'd like added.
## Just-in-time (JIT) provisioning
When JIT is enabled, new users who sign in through your SSO connection will be automatically added to your account.
Users will be created with the default role specified on your [SSO settings page](https://app.checklyhq.com/settings/account/sso-saml), which the account owner can change at any time.
We enable JIT by default when we set up your SSO connection. If you'd like JIT disabled, please let [our Support team](mailto:support@checklyhq.com) know.
We only support JIT for a single tenant. If you have multiple tenants, our team will confirm which account you want JIT enabled for.
## Migrating existing users to SSO
When you log in with SSO for the first time, our system creates a new user. If you already have a Checkly user through a different login method, you will see duplicate users (one created through SSO and another with your previous login method) until your remove the non-SSO user.
Users logging in with SSO have a check mark in the SSO column on your [Members page](https://app.checklyhq.com/settings/account/members):
If you have users created outside of SSO, we recommend migrating them to SSO:
1. Have the team member log out.
2. Have the team member log in with SSO.
* If [JIT](/admin/team-management/single-sign-on#just-in-time-jit-provisioning) is enabled, they will automatically be added to your Checkly account.
* Otherwise, you will need to send them an invite via the [Members page](https://app.checklyhq.com/settings/account/members).
3. Update the team member's role via the [Members page](https://app.checklyhq.com/settings/account/members).
4. Remove the team member's old non-SSO user.
* If there are any API keys tied to this user, you will need to re-generate them. We recommend using [Service API keys](https://app.checklyhq.com/settings/account/service-api-keys) instead, since they are tied to your account and not individual users.
If you're migrating an account owner to SSO, please [contact support](mailto:support@checklyhq.com) once they've logged in through SSO, and we'll transfer ownership to their new user.
If you need assistance with this, we encourage you to contact [our Support team](mailto:support@checklyhq.com).
## Frequently asked questions
### Why do I see duplicate users?
See [Migrating existing users to SSO](/admin/team-management/single-sign-on#migrating-existing-users-to-sso).
### Do you support SCIM?
Currently, SCIM is not supported. If you'd like to add SCIM support, please let us know so we can record your interest as feedback.
### How can I manage user roles?
Currently, we do not support SCIM or any IdP-based role mapping.
Admins and Owners can manually set user roles on the [Members page](https://app.checklyhq.com/settings/account/members), or you can programmatically manage roles using our [CLI](/cli/checkly-members#checkly-members-update) or [public API](/api-reference/accounts/update-a-current-account-member-role).
### How can we enforce SSO for all team members?
You can take several steps to make sure only SSO users are in your account:
* Make sure [SP-initiated logins](/admin/team-management/single-sign-on#service-provider-sp-initiated) are enabled.
* [Migrate all users to SSO.](/admin/team-management/single-sign-on#migrating-existing-users-to-sso)
* Periodically remove non-SSO users. You can do this manually on the [Members page](https://app.checklyhq.com/settings/account/members) or automatically using our [CLI](/cli/checkly-members#checkly-members-update) or [public API](/api-reference/accounts/update-a-current-account-member-role).
* Do not send invitations to users, since they can accept invitations with a non-SSO login. Instead, they should [login through SSO](/admin/team-management/single-sign-on#logging-in-with-sso) and be automatically [JIT provisioned](/admin/team-management/single-sign-on#just-in-time-jit-provisioning) to you account.
Currently, there is no option to require SSO for account members. If you’d like to see this added, please let us know so we can record your interest as feedback.
If you see that SSO checkmark, congratulations! The connection works. If not, no worries — let us know and we can set up a call to troubleshoot.
When existing users log in via SSO, a new user will be created. This is expected, as detailed [here](/admin/team-management/single-sign-on#migrating-existing-users-to-sso).
If you would like [SP-initiated SSO](/admin/team-management/single-sign-on#service-provider-sp-initiated) enabled, let us know. We'll update the connection with your company's email domains.
We recommend [migrating your existing users to SSO](/admin/team-management/single-sign-on#migrating-existing-users-to-sso).
This is not required, but we highly recommend it to prevent any confusion with duplicate users.
If you have any questions or need to modify your SSO connection, please reach out to [support@checklyhq.com](mailto:support@checklyhq.com).
## Logging in with SSO
We support both IdP- and SP-initiated SSO.
### Identity provider (IdP) initiated
IdP-initiated SSO happens when you login to Checkly through your IdP. Typically, this means going to your IdP dashboard and selecting the "Checkly" application.
Checkly enables this by default, though there may be extra configuration needed on your IdP's side.
### Service provider (SP) initiated
SP-initiated SSO happens when you login to Checkly directly by going to [app.checklyhq.com](https://app.checklyhq.com/) and entering your email address.
Using the "Continue with Google" or "Continue with Github" buttons will not redirect to SSO — you must use the email address field.
To check if SP-initiated SSO is enabled for your account, go to your [SSO configuration page](https://app.checklyhq.com/accounts/settings/account/sso-saml) and make sure the **Tenant Domain** field is filled. Email logins from those domains will route to your SSO connection.
To update this setting, reach out to [support@checklyhq.com](mailto:support@checklyhq.com) with the email domain(s) that you'd like added.
## Just-in-time (JIT) provisioning
When JIT is enabled, new users who sign in through your SSO connection will be automatically added to your account.
Users will be created with the default role specified on your [SSO settings page](https://app.checklyhq.com/settings/account/sso-saml), which the account owner can change at any time.
We enable JIT by default when we set up your SSO connection. If you'd like JIT disabled, please let [our Support team](mailto:support@checklyhq.com) know.
We only support JIT for a single tenant. If you have multiple tenants, our team will confirm which account you want JIT enabled for.
## Migrating existing users to SSO
When you log in with SSO for the first time, our system creates a new user. If you already have a Checkly user through a different login method, you will see duplicate users (one created through SSO and another with your previous login method) until your remove the non-SSO user.
Users logging in with SSO have a check mark in the SSO column on your [Members page](https://app.checklyhq.com/settings/account/members):
If you have users created outside of SSO, we recommend migrating them to SSO:
1. Have the team member log out.
2. Have the team member log in with SSO.
* If [JIT](/admin/team-management/single-sign-on#just-in-time-jit-provisioning) is enabled, they will automatically be added to your Checkly account.
* Otherwise, you will need to send them an invite via the [Members page](https://app.checklyhq.com/settings/account/members).
3. Update the team member's role via the [Members page](https://app.checklyhq.com/settings/account/members).
4. Remove the team member's old non-SSO user.
* If there are any API keys tied to this user, you will need to re-generate them. We recommend using [Service API keys](https://app.checklyhq.com/settings/account/service-api-keys) instead, since they are tied to your account and not individual users.
If you're migrating an account owner to SSO, please [contact support](mailto:support@checklyhq.com) once they've logged in through SSO, and we'll transfer ownership to their new user.
If you need assistance with this, we encourage you to contact [our Support team](mailto:support@checklyhq.com).
## Frequently asked questions
### Why do I see duplicate users?
See [Migrating existing users to SSO](/admin/team-management/single-sign-on#migrating-existing-users-to-sso).
### Do you support SCIM?
Currently, SCIM is not supported. If you'd like to add SCIM support, please let us know so we can record your interest as feedback.
### How can I manage user roles?
Currently, we do not support SCIM or any IdP-based role mapping.
Admins and Owners can manually set user roles on the [Members page](https://app.checklyhq.com/settings/account/members), or you can programmatically manage roles using our [CLI](/cli/checkly-members#checkly-members-update) or [public API](/api-reference/accounts/update-a-current-account-member-role).
### How can we enforce SSO for all team members?
You can take several steps to make sure only SSO users are in your account:
* Make sure [SP-initiated logins](/admin/team-management/single-sign-on#service-provider-sp-initiated) are enabled.
* [Migrate all users to SSO.](/admin/team-management/single-sign-on#migrating-existing-users-to-sso)
* Periodically remove non-SSO users. You can do this manually on the [Members page](https://app.checklyhq.com/settings/account/members) or automatically using our [CLI](/cli/checkly-members#checkly-members-update) or [public API](/api-reference/accounts/update-a-current-account-member-role).
* Do not send invitations to users, since they can accept invitations with a non-SSO login. Instead, they should [login through SSO](/admin/team-management/single-sign-on#logging-in-with-sso) and be automatically [JIT provisioned](/admin/team-management/single-sign-on#just-in-time-jit-provisioning) to you account.
Currently, there is no option to require SSO for account members. If you’d like to see this added, please let us know so we can record your interest as feedback.